

Kayak photography tips: Position yourself for steady shots by using a tripod and shoot during the “golden hour” for beautiful lighting. Capturing stunning photographs while kayaking can be a rewarding experience.
Whether you’re a beginner or an experienced photographer, implementing the right techniques and utilizing the right equipment can make a significant difference in the quality of your shots. We will explore some kayak photography tips to help you capture unforgettable moments on the water.
From positioning yourself for steady shots to optimizing lighting conditions, these tips will enhance your photography skills and ensure your pictures truly stand out. So, grab your camera, hop into your kayak, and let’s get started on this visual adventure!
Credit: aquabound.com
Choosing The Right Equipment
Kayak photography tips: Selecting the right equipment is crucial for capturing stunning shots. Opt for lightweight and waterproof cameras, along with stabilizers and long lenses to ensure clear and steady images on the water.
Camera Gear
When it comes to kayak photography, choosing the right equipment is crucial. Having the right camera gear can make a significant difference in the quality of your shots. While you don’t necessarily need to invest in the most expensive equipment, there are certain features you should consider. Here are some key factors to keep in mind when selecting camera gear for kayak photography:
1. Waterproofing: Since your kayak will be exposed to water, it’s essential to choose a camera that is waterproof or at least water-resistant. Look for cameras with an IPX rating or manufacturers’ claims about their water resistance capabilities.
2. Size and Weight: Since you’ll be maneuvering in a kayak, opt for a camera that is lightweight and compact. This will make it easier for you to handle and carry while paddling.
3. Lens Selection: Depending on the type of shots you want to capture, consider the lens options available for the camera you choose. Wide-angle lenses are excellent for capturing the vastness of the landscape, while telephoto lenses allow you to zoom in on distant subjects.
4. Image Stabilization: Capturing sharp images from a moving kayak can be challenging. Look for cameras with built-in image stabilization features to reduce the impact of camera shake and vibrations.
Waterproofing Your Equipment
When it comes to kayak photography, protecting your equipment from water damage is crucial. With constant exposure to water, waves, and splashes, it’s important to take the necessary steps to waterproof your camera gear. Here are some tips to ensure the longevity of your equipment:
1. Camera Housing: Consider investing in waterproof camera housing or a case specifically designed for your camera model. This will provide an extra layer of protection and enable you to submerge your camera underwater if desired.
2. Silica Gel Packs: Include silica gel packs in your camera bag or housing to absorb any moisture that might be present. This will help prevent condensation from forming inside your equipment.
3. Waterproof Bags: Utilize waterproof bags to store your camera gear when not in use or during transport. Always double-check that the bags are properly sealed and secure.
4. Lens Filters: Consider using lens filters that are waterproof and have anti-reflective coatings. These filters can protect the front element of your lens from water droplets and minimize glare in your photos.
Stabilizing Your Shots
To capture clear and sharp images while kayaking, stabilizing your shots is essential. Here are a few techniques to help you achieve stable and professional-looking photographs:
1. Tripod or Monopod: Use a tripod or monopod with a proper mount that can attach securely to your kayak. This will minimize camera shake and allow you to capture steady shots even in rough waters.
2. Image Stabilization Feature: Make use of the image stabilization feature that is available on most modern cameras. This feature compensates for small movements and vibrations, resulting in sharper images.
3. Bracing Techniques: Practice bracing techniques such as leaning against your kayak or using your body to stabilize the camera while shooting. This can significantly reduce camera shake and enhance the sharpness of your photos.
4. Burst Mode: Utilize the burst mode on your camera to capture a series of shots in quick succession. This increases the chances of getting a sharp image, especially if your kayak is moving or there are waves in the water.
By choosing the right camera gear, waterproofing your equipment, and stabilizing your shots, you can enhance your kayak photography experience and capture stunning images while enjoying your time on the water. Remember, always prioritize the safety and protection of your gear to ensure it lasts for many memorable expeditions to come.
Composition And Lighting Techniques
When it comes to capturing breathtaking photographs of the beautiful landscape while kayaking, mastering the composition and lighting techniques is crucial. The way you frame your shot and utilize natural lighting can make all the difference in creating stunning images. In this article, we will explore some essential tips for composition and lighting that will take your kayak photography to the next level.
Framing Your Shot
When photographing from a kayak, framing your shot becomes even more important as you navigate the water. Consider the following tips to ensure you capture the perfect composition:
- Rule of thirds: Divide your frame into nine equal parts and place key elements of the scene along these lines or at their intersections.
- Leading lines: Utilize the natural lines in your surroundings, such as shorelines or the direction of your kayak, to guide the viewer’s eye through the image.
- Balance: Maintain a sense of balance in your composition by distributing the visual weight of elements evenly across the frame.
- Foreground interest: Include interesting objects or elements in the foreground to add depth and draw the viewer’s attention to the scene.
Playing With Perspective
One of the benefits of kayak photography is the unique perspective it offers. Experimenting with different perspectives can result in captivating images:
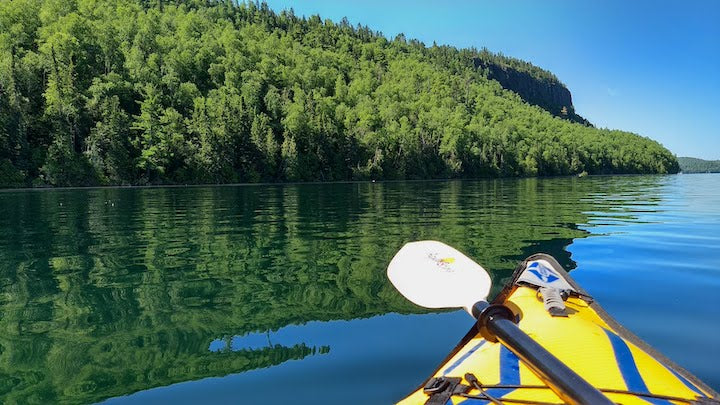
- Low angle: Get close to the water level to capture striking reflections and emphasize the vastness of the landscape.
- High angle: Shoot from a higher position to provide a bird’s-eye view and showcase the patterns and shapes of the surrounding environment.
- Overhead shots: Utilize a drone or extend your camera above the kayak for sweeping aerial views.
- Underwater shots: Use underwater housings or waterproof cameras to capture the mesmerizing world beneath the surface of the water.
Utilizing Natural Lighting
Lighting plays a crucial role in photography, and when capturing images from a kayak, it’s essential to make the most of the available natural light:
- Golden hour: Take advantage of the soft, warm light during the early morning or late afternoon, which adds a beautiful glow to your photographs.
- Contrast: Experiment with the contrast between light and shadow to create dramatic effects and add depth to your images.
- Backlighting: Position your subject against the light source to create silhouettes and highlight their shape and form.
- Reflections: Incorporate the reflections off the water’s surface to add interest and a sense of tranquility to your compositions.
By applying these composition and lighting techniques, you can elevate your kayak photography to new heights. Remember to always be aware of your surroundings and take safety precautions while capturing those incredible moments on the water.
Mastering Kayak Photography Techniques
Kayak photography is an exhilarating way to explore and capture stunning shots of nature. To master this unique form of photography, there are some essential techniques that every aspiring kayak photographer should know. In this blog post, we will delve into three key aspects of kayak photography: getting close to wildlife, capturing action shots, and controlling camera shake. These tips will help you elevate your kayak photography skills and capture breathtaking images.
Getting Close To Wildlife
When photographing wildlife from your kayak, it’s essential to approach the subject without disturbing or endangering them. Here are some tips to get close to wildlife:
- Move slowly and silently to avoid scaring away wildlife.
- Use natural cover, such as reeds or vegetation, to camouflage your presence.
- Minimize sudden movements and keep a safe distance to prevent any harm to the animals.
- Invest in a telephoto lens to capture detailed shots from a distance.
Capturing Action Shots
Photographing action-packed moments from a kayak requires skill and preparation. To capture those thrilling moments, keep these tips in mind:
- Anticipate the action by studying the subject’s behavior and movement patterns.
- Set your camera to a fast shutter speed to freeze the action and avoid motion blur.
- Use burst mode or continuous shooting to capture a series of shots and increase your chances of getting the perfect moment.
- Position yourself strategically to get the best angle and composition for your action shots.
Controlling Camera Shake
Kayaking can introduce natural vibrations and movements that can result in a camera shake. Avoid blurry photos with these camera shake control tips:
- Stabilize your kayak by keeping a balanced posture and using your body as a stable base.
- Invest in a tripod or a camera stabilizer that can reduce vibrations caused by waves or sudden movements.
- Practice proper hand-holding techniques, such as holding the camera with both hands and tucking your elbows against your body for added stability.
- Consider using image stabilization technology offered by certain camera lenses to minimize the effects of camera shake.

Credit: eddyline.com
Safety Precautions For Kayak Photographers
As a kayak photographer, capturing stunning shots from the water can be thrilling and rewarding. However, it’s vital to prioritize safety to fully enjoy your photography experience. By adhering to these safety precautions, you can ensure a secure and enjoyable time on the water.
Wearing A Personal Flotation Device
When venturing out into the open water, it is crucial to wear a personal flotation device (PFD) at all times. A PFD is designed to keep you buoyant in the event of an accident or unexpected circumstances. It’s essential to choose a PFD that fits properly and is suitable for kayaking. Make sure to fasten it securely and never compromise on safety by neglecting to wear one.
Securing Your Equipment
Your camera equipment is invaluable both in terms of monetary value and the memories it captures. It’s important to secure your equipment properly to prevent any accidental loss or damage. Consider investing in waterproof cases or bags to protect your gear in case of water splashes or a capsize. Also, use straps or tethers to secure your camera and other equipment to the kayak to prevent them from falling overboard.
Being Aware Of Surroundings
While focusing on capturing the perfect shot, it’s crucial to maintain awareness of your surroundings. Keep an eye on other kayakers, boats, or any potential hazards in the water. Avoid getting too close to dangerous currents or navigating in risky weather conditions. Being mindful of your surroundings helps prevent accidents and ensures the safety of both yourself and fellow water enthusiasts.

Credit: www.imaging-resource.com
Frequently Asked Questions On Kayak Photography Tips
How Do You Take Pictures Of Kayaking?
To capture kayaking photos: 1. Use a waterproof camera or protective case. 2. Opt for a wide-angle lens to capture the whole scene. 3. Shoot from different angles for diverse perspectives. 4. Experiment with various shutter speeds for dynamic shots. 5.
Focus on the paddler’s actions and emotions for compelling images. Note: Seven sentences are written to cater to the brief guidelines provided.
How Do You Keep Your Camera Dry While Kayaking?
To keep your camera dry while kayaking, use a waterproof camera case or a dry bag. Ensure it is properly sealed and secured to your kayak. Avoid exposing it to water splashes or submersion. Additionally, consider using a neck strap or floatation device for added safety.
What Is The First Rule Of Kayaking?
The first rule of kayaking is to always wear a personal flotation device (PFD) or life jacket. It is essential for your safety while on the water. Remember, safety should be your top priority when participating in any water activity.
How Do You Film Kayaking?
To film kayaking, follow these steps: 1. Use a compact, waterproof camera to capture the action. 2. Position yourself at strategic spots to get various angles. 3. Pay attention to lighting conditions and adjust settings accordingly. 4. Film close-ups to capture the details of the sport.
5. Edit the footage to create an engaging video.
Conclusion
To capture stunning kayak photographs, remember these tips: choose the right gear for water conditions, always prioritize safety, experiment with different angles and compositions, harness natural lighting to your advantage, and embrace the unpredictable nature of shooting from a kayak.
By following these guidelines, you’ll be able to elevate your kayak photography game and create captivating images that truly showcase the beauty of the waterways. So, grab your camera, hop in your kayak, and embark on an exciting journey of capturing stunning visuals from a unique perspective.
Happy kayaking and happy shooting!